 In the glamour world, very few things stand alone. Oh sure, you can have that über gorgeous red carpet dress that turns the heads of every status photographer on the runway, but the fact remains that the hair, makeup, jewels and shoes all play a part in that outfit being a front page headline.
That simple fact can also play a part in everyday looks for anyone. Whether you are a 9-5 office worker, a stay-at-home mom, an ever-scouting fad writer or an out there/have-your-own-style tattoo shop manager, layering fashions, accessories, skin care ingredients and makeup items can move a simple daytime look into the WOW! category with a couple of easy steps.
Here are a few to get you started. Following the bouncing ball:
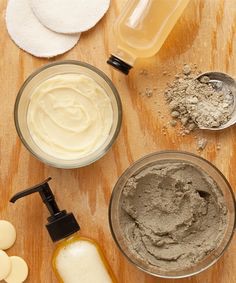 **Skin Care**-Washing, treating and moisturizing are, nowadays, the bare necessities. If you AT LEAST do that? You’ll hold your ground. But why not combine a few skin-loving ingredients to treat your face to an experience that will multitask with just a few natural, easy to find things. Because my face tends to be a bit dry in the winter, I tend to make my own cleanser/masks to get moisture and anti-aging properties from natural ingredients for the best results. It’s actually simple…
1. Combine 2 tbsp of a mashed overripe banana, 1 tsp raw honey (local is best), 1 tsp heavy cream, 1/2 tsp instant coffee & 1/4 tsp white sugar. (This may sound like a lot, but think ahead: you can freeze extra overripe bananas in the freezer, buy the instant coffee once to use in other things as well, and substitute powdered milk for heavy cream for longer shelf life.)
2. Mix all your ingredients EXCEPT the sugar till the consistency is a bit thick and the coffee has dissolved. Then add the sugar last.
3. Begin to rub it onto your face in small, circular motions. Go over it a few times, adding a bit more each time.
4. After about 5-10 minutes, wash off with warm water & a gentle cleanser (like Aveeno’s Foaming Face Wash)
5. Pat dry.
Whala! Instant face treatment with a combo of fresh ingredients. Your skin is clean, moist, soft and treated. Easy mixing, right? Now, let’s think about what you just did: *Bananas naturally cleanses while hydrating & adding anti-aging vitamins into your skin; *Raw honey is a natural healer and will help heal fines lines due to small skin cracks and stretching; *Heavy cream is loaded with moisturizers and antibodies to fight infection and environmental skin damage; *Instant coffee has just enough caffeine to constrict blood vessels, even your skin tone and awaken tired skin; *White sugar is a gentle exfoliant that will remove dead skin cells and allow the other ingredients to work on the next active layer.
Kind of all makes sense, huh? It’s not a lot of work and if you refrigerate the leftovers you can use what is left daily for up to a week. There are so many ingredients you can add or substitute if you want other skin problems targeted. Tip: Don’t like the way the bananas turn brown in the fridge? Use Stage 1 baby food bananas. They last longer, don’t turn brown and the little bit of lemon juice that is in them helps even out your skin tone too. Baby peaches are good to soften skin. Oatmeal powder can reduce pore size. Yogurt has natural bacteria to help fight acne and breakouts. (Click here for other ingredients and recipes that can help your skin type.)
 **Mascara**-Any YouTube video will tell you that you should wear between 8-10 coats of mascara for drop dead looking eyes. Ummmm… no offense? I don’t have time for that. And it never looks like the pictures anyways. So what’s my layering trick for great, long lashes? It’s kind of simple and doesn’t need a lot stuff. But you will need 3 different mascaras:
1. Get a good mascara that has a great comb wand. This will enable you to coat each lash for length and keep them separated. Plus you can get the little innie lashes with a pointed brush. My go to brand? Benefit Cosmetics “They’re Real!” Mascara. (Sephora, $24)
2. Next, when mascara is completely dry, curl them with a eyelash curler. None specifically, just make sure you are comfortable using it and it doesn’t pinch your eyelid or pull out any lashes.
3. Another coat of mascara. This time use one that lengthens and keeps the separated but begins to add volume. Again, a good wand is important. A comb is good again but can be one whose “bristles” are tighter together. I really like Buxom Lash Mascara. It keeps them fanned with a bit of thickness. (Sephora, $19)
4. Last step? One coat of a thick foofy brushed waterproof mascara. Lock in that look and keep your butterfly eyes looking smudge-proof all day. There are always new ones on the market and I try them before mine dry out and get old, but I’ve always had great success with Lancôme’s Waterproof Hypnose Drama Mascara.
Don’t get scared away by my suggestions of department store brands. I have had great success as well with drugstore brands such as Rimmel’s Scandal’Eyes Show Off Mascara, Lash Sensational Mascara from Maybelline, and L’Oreal Power Voluminous 24hr Mascara. Each is easy on the wallet but still layer-able to get the look you want.
 **Lips**-Maintaining a good, even lip tone with color, gloss, or both will take a little getting used to. The fact is, I don’t have time all day to constantly reapply an entire color routine on my lips. And between chatting all day and drinking coffee, it stays everywhere but on my lips. It has taken some time to get a good routine down, to maintain a lip look that will only need a touch up now and then. But you’ve got to trust me to play with this till you get the look/color you want. Ready?:
1. Exfoliate your lips with 2-3 drops of olive oil and a pinch of white sugar. Dab it on your lips then roll them back and forth so the oil penetrates and the sugar takes off any dry skin. Wipe off excess sugar with a tissue and blot excess oil.
2. Outline your lips with a neutral lip pencil. A great find is Rimmel 1000 Kisses Lasting Finish Pencil Lip Liner in Nude or Avon’s Glimmersticks Lip Liners in Simply Spice or Pink Cashmere.
3. Next time you are shopping, hunt and find a packet of unsweetened Pink Lemonade Kool-Aid and/or Cherry Kool-Aid (if you find other flavors, grab them. They are pennies and can be combined for great shades.) Using a Q-tip, dot a little bit of the powders on your lips, combining to achieve the color you want. If you have to add a drop of water to the other end of the Q-tip to help blend, that’s fine. Just add evenly so you don’t have one lip one color, one lip another. When done, let sit & dry for about 5 min. (If you prefer to just use one flavor, that’s fine too.)
4. Using a lip brush, apply a small amount of a good balm or gloss to keep lips soft. I prefer a balm, as glosses can get oily and transfer more easily giving your color less stay power. My fave right now? Chapstick’s Cake Batter formula. Yum! If you like a bit of frost to your shade, Nivea has a “Kiss of Shimmer Radiant Lip Care” which tops off for a nice, long-lasting sexy frosty shade while keeping lips soft & smooth.
5. Carry a gloss with you that matches today’s Kool-Aid shade in case of early fading or blotchiness or for an extra hint of colored shine.
If a stain isn’t your thing, try to find a ONE STEP lipstick with mega-stay power to keep your lips bright & soft. It won’t last as long but will buy you time in between lip breaks. A good find for me? New York Color Expert Last Lipstick. I find it lasts longer than any tube lipstick I own and the price is a steal.
So there you have it. Layering to get the look you love and the stopping the clock of aging. (Okay, not really but we can sure try to slow it down!) Good luck with these suggestions and please–PLEASE!–share if you have any of your own!
Next time? I think we will tackle eye liners, sweaters and….let me think on it.


